Screen recording on a Chromebook is a crucial functionality that serves myriad purposes, enhancing productivity and communication. Whether for educational tutorials, professional presentations, troubleshooting, or content creation, screen recording empowers users to capture and share their digital experiences effortlessly. Chromebooks offer native screen recording features, simplifying the process with easy-to-access shortcuts and settings. Additionally, a variety of third-party tools and extensions further expand the capabilities, enabling customization, editing, and advanced recording options. In this digital age, the ability to record your Chromebook screen is an invaluable asset for both personal and professional endeavors, fostering effective communication and knowledge sharing.
Taking a Screenshot on a Chromebook
Taking a screenshot on a Chromebook is a fundamental skill that comes in handy for various purposes, from capturing important information to creating instructional materials.
Chromebooks offer several convenient methods to capture screenshots, making it accessible to users of all skill levels.
- Keyboard Shortcut:
- The most common way to take a screenshot on a Chromebook is by using keyboard shortcuts. To capture the entire screen, press the “PrtScn” (Print Screen) key. On some Chromebooks, this key might be labeled as “F5” or “F11.” This captures the entire screen and saves it to your Downloads folder.
- If you only want to capture the active window, press “Alt” + “PrtScn.” This is particularly useful when you have multiple windows open, and you want to focus on one.
- Partial Screenshot:
- To capture a specific part of the screen, press “Ctrl” + “Shift” + “PrtScn.” Your cursor will turn into a crosshair. Click and drag to select the area you want to capture, and then release the mouse button. The selected area will be saved as an image.
- Using the Overview Mode:
- Press the “Overview” key, which typically looks like a square or two overlapping rectangles, on your keyboard.
- In the overview mode, right-click on the window you want to capture, and then select “Take a screenshot.” This method is useful when you want to capture a specific application or window.
- Touchscreen Method (if available):
- If your Chromebook has a touchscreen, you can use it to take screenshots.
- Press and hold the stylus or your finger on the screen. After a moment, a toolbar will appear at the bottom.
- Tap the camera icon to capture a screenshot.
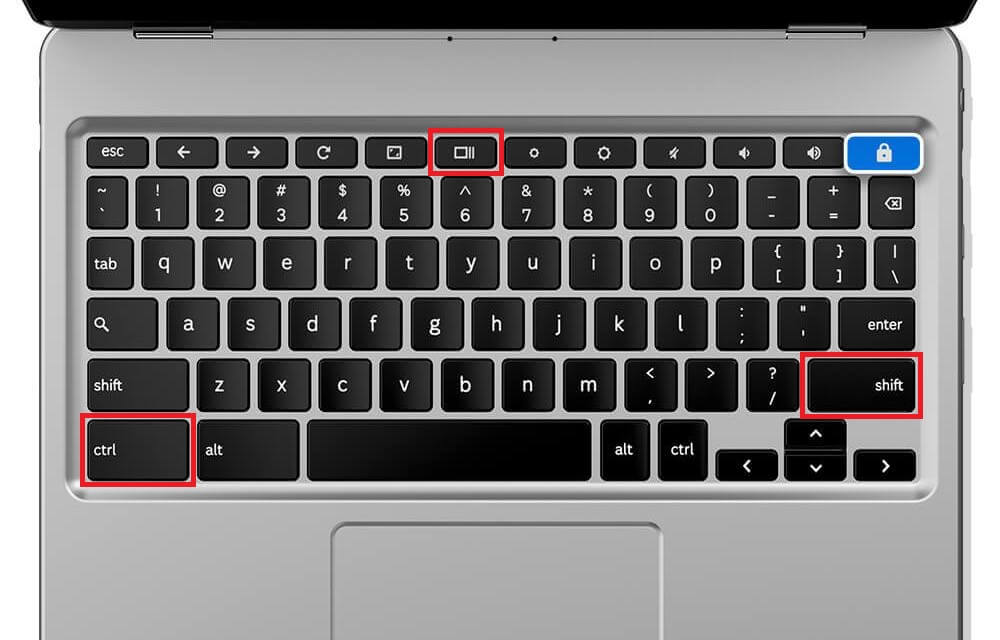
- Using the “Capture” Shortcut:
- Press “Ctrl” + “Shift” + “Show windows” (often represented by a rectangle with two lines to the right). This captures the entire screen.
After taking a screenshot, you’ll receive a notification in the bottom-right corner of your screen. You can click on it to open the screenshot, where you can annotate it or save it to your Downloads folder.
These various methods for taking screenshots on a Chromebook make it easy for users to capture and share important information, create tutorials, troubleshoot issues, or simply document what’s on their screen. Whether you prefer keyboard shortcuts or touchscreen interactions, Chrome OS offers flexibility and convenience in capturing screenshots.
Some Chromebooks come equipped with a dedicated Screenshot key, typically labeled as “PrtScn” or “Screen Capture.” Pressing this key instantly captures the entire screen and saves it as an image in the Downloads folder. It offers a quick and convenient way to take screenshots without the need for additional key combinations or shortcuts.
In addition to the standard key combinations for taking screenshots on Chromebooks, there are alternative options for users with external keyboards or specific preferences. For external keyboards, you can use Ctrl + Shift + F5 to capture the entire screen. Another alternative is Shift + Ctrl + Show windows, which is especially useful when you want to capture a specific window or application. These alternative key combinations provide flexibility and convenience for users who may have different keyboard layouts or preferences for capturing screen content on their Chromebooks.
Chromebooks offer versatile screenshot options, catering to various capture needs:
- Full-Screen Screenshot:To capture the entire screen, press “PrtScn” or “Ctrl + Shift + F5” on external keyboards. It captures everything displayed, ideal for comprehensive snapshots.
- Partial Screenshot:Use “Ctrl + Shift + PrtScn” to initiate partial screenshots. A crosshair cursor allows you to select a specific area to capture, ensuring precision.
- Window Screenshot:In overview mode, press “Ctrl + Shift + Show windows,” then select the window you want to capture. This is perfect for isolating specific application content.
Tips for Adjusting the Screenshot Area:
- When using crosshair cursor for partial screenshots, press the “Shift” key while dragging to maintain the aspect ratio for squares or straight lines.
- To move the selected area while dragging the crosshair cursor, press and hold the “Alt” key.
- For fine adjustments, use the arrow keys on the keyboard to move the selection one pixel at a time, helping you capture exactly what you need.
Recording your screen on a Chromebook
Recording your screen on a Chromebook can be essential for creating tutorials, capturing gameplay, or troubleshooting. Chrome OS offers built-in screen recording features, and there are also third-party tools available to enhance your recording capabilities.
Built-in Screen Recording
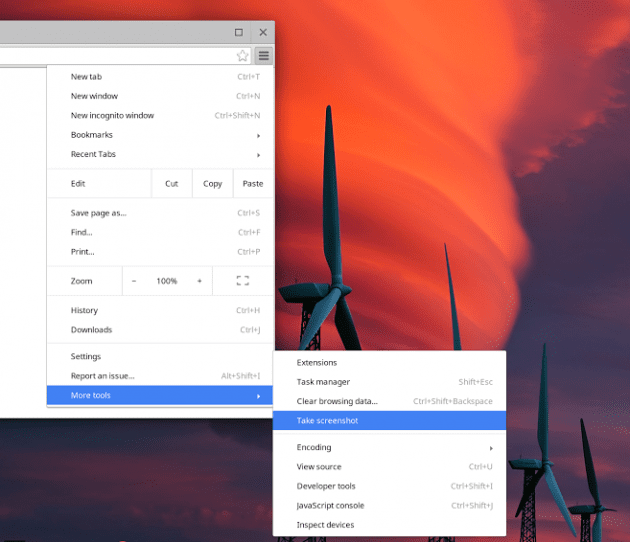
- Quick Settings:Chrome OS provides a quick and easy way to start screen recording. Open the Quick Settings menu by clicking on the system tray in the lower-right corner. Find the “Screen capture” icon, which looks like a camera, and click it to start recording.
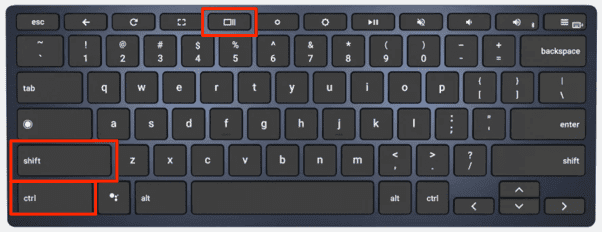
- Keyboard Shortcut:Press “Ctrl” + “Shift” + “S” to begin recording. You can also press “Ctrl” + “Shift” + “F5” on external keyboards.
- Recording Options:Chrome OS allows you to choose between capturing the entire screen or a specific window. You can switch between these options during recording by clicking on the “Screen capture” notification and selecting the desired mode.
- Stop and Save:To stop the recording, click the “Stop” button in the notification that appears. Your recording will be saved in the “Screen recordings” folder within the “Downloads” directory.
Third-party Screen Recording Tools
While Chrome OS offers basic screen recording features, third-party tools can provide additional functionality and customization:
- Loom:Loom is a popular Chrome extension that offers screen recording with the ability to capture your camera and microphone as well. It’s great for creating tutorials and video messages.
- Screencastify:Another powerful Chrome extension, Screencastify, allows you to record your screen, webcam, or both simultaneously. It offers editing tools and cloud storage for your recordings.
- Clipchamp:Clipchamp is an online video editor that includes a screen recorder. It’s useful for capturing and editing your recordings within a web browser.
- OBS Studio:For more advanced users, OBS Studio is a free, open-source software that offers extensive customization options. It’s excellent for recording gameplay, live streaming, and professional presentations.
Tips for Screen Recording on a Chromebook
- Check your microphone and camera settings before recording to ensure they are working correctly.
- Clear any clutter from your desktop to keep the recording focused.
- Use a stable internet connection if you plan to live stream your recording.
- Adjust the recording quality settings to balance video quality and file size.
- Consider using an external microphone or headset for better audio quality.
- Practice your presentation or tutorial beforehand to ensure a smooth recording.
Screen recording on a Chromebook is a valuable tool for a wide range of tasks, from sharing knowledge to creating engaging content. Whether you choose the built-in options or third-party tools, mastering screen recording can greatly enhance your productivity and communication on your Chromebook.
To initiate screen recording on a Chromebook, press the key combination Shift + Ctrl + Show windows. This key combination activates the screen recording feature, allowing you to capture your entire screen or a specific window. It’s a quick and convenient way to start recording, whether you’re creating tutorials, capturing gameplay, or troubleshooting. After pressing the key combination, you’ll typically see a countdown, and then the recording will commence. You can stop the recording at any time by clicking the stop button in the notification that appears, and the recorded video will be saved in the “Screen recordings” folder in your “Downloads” directory.
When screen recording on a Chromebook, you have several options to tailor your capture:
- Record the Full Screen:Choose to record your entire screen, capturing everything that’s currently displayed. This is useful for comprehensive presentations or capturing the entire desktop environment.
- Record a Partial Screen:Opt for a partial screen recording to focus on a specific area of interest. You can use this to highlight and explain particular sections of your screen, making it perfect for tutorials or demonstrations.
- Record a Specific Window:Select a particular application or window to record, excluding everything else from the capture. This is handy when you want to spotlight a single program or task while keeping the rest of your screen private.
These screen recording options offer flexibility, allowing you to adapt your recording to the specific content or purpose you have in mind.
To end a screen recording session on a Chromebook, click the “Stop” button in the notification that appears on your screen during the recording. This will halt the recording process, and your captured video will be saved in the “Screen recordings” folder within the “Downloads” directory on your Chromebook.
Third-Party Tools for Screen Recording
While Chromebooks offer built-in screen recording features, third-party tools can enhance your recording capabilities, providing additional options and functionality. Here are some notable third-party tools for screen recording on Chromebooks:
- Loom:
- Loom is a popular Chrome extension that simplifies screen recording. It allows you to capture your screen, webcam, or both simultaneously. You can also record your microphone for narration.
- Loom offers features like video editing, cloud storage for your recordings, and the ability to create and share videos directly from your browser. It’s great for creating tutorials, video messages, or product demos.
- Screencastify:
- Screencastify is another widely-used Chrome extension for screen recording. It offers options to record your entire screen, specific tabs, or just the webcam. You can also include your microphone for audio narration.
- This tool provides editing capabilities, such as trimming and adding annotations, and it integrates with Google Drive and YouTube for easy sharing and storage.
- Clipchamp:
- Clipchamp is an online video editor that includes a screen recorder. It allows you to record your screen and webcam simultaneously. You can edit your recordings directly within the tool, making it a convenient all-in-one solution.
- Clipchamp is accessible directly from your web browser and offers cloud storage options. It’s suitable for creating instructional videos, presentations, and more.
- OBS Studio:
- OBS Studio is a free, open-source software available for various platforms, including Chrome OS. While it has a steeper learning curve than browser extensions, it offers extensive customization options.
- OBS Studio is highly versatile and is often used for more advanced tasks like live streaming, capturing gameplay, and professional presentations. It provides advanced settings for video and audio, multiple scenes, and sources.
- Nimbus Screenshot and Screen Video Recorder:
- This Chrome extension combines both screenshot capture and screen recording functionalities. It enables you to record your screen, capture screenshots, and annotate them.
- Nimbus provides various recording options, such as recording the entire screen, a specific area, or a selected tab. It also supports webcam and microphone recording.
Tips for Choosing a Third-Party Screen Recording Tool
- Consider your specific needs and the features required, such as webcam recording, editing, and storage options.
- Check compatibility with your Chromebook model and Chrome OS version.
- Read user reviews and ratings to gauge the reliability and user-friendliness of the tool.
- Evaluate whether the tool offers a free trial or a free version with basic features before committing to a subscription.
Ultimately, the choice of a third-party screen recording tool on your Chromebook depends on your preferences, workflow, and the specific tasks you want to accomplish. These tools provide a range of options to cater to both basic and advanced screen recording needs, enhancing your productivity and creativity.
Screencastify
Screencastify is a versatile and user-friendly screen video recorder designed primarily for Google Chrome and Chromebook users. With its seamless integration into the Chrome browser, Screencastify offers a convenient way to capture, edit, and share your screen recordings effortlessly.
Features:
- Screen Recording: Screencastify allows you to record your entire screen, a specific tab, or just your webcam, making it suitable for a wide range of use cases such as creating tutorials, presentations, or demonstrating software.
- Annotation Tools: Enhance your recordings with annotations, text overlays, and drawings. These tools are handy for emphasizing key points during your screen capture.
- Editing Options: Trim and edit your recordings directly within the tool. This feature streamlines the post-production process, saving you time and effort.
- Export and Sharing: Once you’re satisfied with your recording, Screencastify provides easy export options to save videos to Google Drive or share them directly on YouTube or other platforms.
- Automatic Saving: Your recordings are automatically saved to Google Drive, ensuring you never lose your work.
How to Install and Use on a Chromebook
- Installation:
- Open your Chrome browser.
- Visit the Chrome Web Store.
- Search for “Screencastify” and click “Add to Chrome” to install the extension.
- Follow the setup instructions and grant necessary permissions.
- Recording:
- Click the Screencastify extension icon in your browser.
- Select your recording options (screen, tab, or webcam).
- Click the “Record” button to start recording.
- After recording, click the extension icon again and select “Stop Recording.”
- Editing and Sharing:
- The Screencastify editor will open automatically.
- Trim and edit your video as needed.
- Save the edited video to Google Drive or share it online.
Screencastify is a valuable tool for Chromebook users, offering a straightforward way to capture and share screen recordings for educational, professional, or personal purposes. Its seamless integration with Chrome makes it a go-to choice for those seeking a hassle-free screen recording solution.
Screen Recorder
Screen Recorder is a user-friendly Chrome extension available on the Chrome Web Store, designed to simplify the process of capturing screen recordings and creating screencasts. It provides a quick and easy way to record your browser tab or desktop activities, making it ideal for creating tutorials, presentations, or sharing information online.
Overview:
- Screen Recorder offers essential screen recording features in a lightweight package.
- It allows you to record your entire screen or select a specific tab, giving you flexibility in what you capture.
- The extension provides a simple interface with easy-to-access recording controls.
Installation and Usage Guide:
- Installation:
- Open your Chrome browser.
- Navigate to the Chrome Web Store.
- Search for “Screen Recorder” and click “Add to Chrome” to install the extension.
- Follow the on-screen instructions to grant necessary permissions.
- Recording:
- Click the Screen Recorder icon added to your browser’s toolbar.
- Choose whether to record the entire screen or a specific tab.
- Adjust the recording settings, such as video quality and audio source.
- Click the “Start Recording” button to initiate the recording.
- Editing and Saving:
- After finishing the recording, click the extension icon again and select “Stop Recording.”
- You can preview the recording and trim it as needed.
- Save the video file to your local storage or share it online.
Screen Recorder is a convenient tool for Chrome users who require basic screen recording functionality without the need for advanced editing features. Its straightforward installation process and user-friendly interface make it accessible to a wide range of users seeking to create screen recordings for various purposes.
Additional tips and tricks
- Keyboard Shortcuts: Chromebooks offer keyboard shortcuts for screen recording. Press “Ctrl + Shift + Show Windows” (or “Ctrl + Shift + F5” on some models) to start or stop a recording quickly. You can customize these shortcuts in your Chromebook’s settings.
- Audio Recording: To record audio along with your screen, ensure your microphone is enabled. You can control microphone settings in the Chromebook’s system settings. This is useful for adding narration or capturing system sounds.
- Adjust Screen Resolution: Before recording, consider adjusting your screen resolution to match the desired video output. Go to “Settings” > “Display” and choose the resolution that suits your recording needs for optimal quality.
- External Microphone: For better audio quality, consider using an external microphone. USB or Bluetooth microphones can provide clearer audio compared to the built-in microphone.
- Fullscreen Mode: To record in fullscreen mode, press “Ctrl + Fullscreen” (or “Ctrl + F4” on some models). This ensures your entire screen is captured.
- Mouse Highlighting: If you want to emphasize mouse clicks during your recording, enable the option in your screen recording tool settings. This helps viewers follow your actions more easily.
- Practice Runs: Before recording important content, do a few practice runs to get comfortable with the screen recording process. This reduces mistakes and improves the quality of your final recording.
- File Management: Regularly organize and clean up your recorded files to avoid clutter in your storage. You can move or delete files from the “Downloads” folder.
- Cloud Storage: Consider using cloud storage services like Google Drive to save your recordings. This ensures easy access from any device and saves local storage space.
- Editing Software: For more advanced editing capabilities, you can use video editing software like Adobe Premiere Rush or online tools like Kapwing to enhance your recordings.
By implementing these tips and tricks, you can make the most out of your screen recording experience on a Chromebook, ensuring high-quality, informative, and engaging content.
Basic editing options available on a Chromebook for screenshots and recordings include cropping, annotating with shapes and text, and adjusting brightness and contrast. For screenshots, use the built-in “Gallery” app to crop and annotate images. For video recordings, you can trim clips in the “Files” app, and Chrome extensions like “Video Cutter” offer more extensive editing options. Additionally, cloud-based tools like Google Photos offer basic photo and video editing features accessible from your Chromebook’s browser, making it easy to enhance your captured content.
Sharing your recordings or screenshots on a Chromebook is straightforward
- Google Drive: Save your recordings or screenshots to Google Drive, where you can create shareable links or share directly with specific individuals or groups. Right-click the file, select “Share,” and customize sharing settings.
- Email: Attach your files to an email and send them to recipients directly from your Chromebook’s email client.
- Cloud-Based Services: Use platforms like YouTube for videos or Google Photos for images to share content publicly or privately. Generate shareable links or invite collaborators.
- Collaboration Tools: Utilize Google Workspace apps (Docs, Sheets, and Slides) to embed or link to your recordings or screenshots, allowing seamless collaboration with others on documents and presentations.
In conclusion
We’ve explored the world of screen recording on a Chromebook, discovering user-friendly tools like Screencastify and Screen Recorder. We’ve covered installation, basic features, and essential tips and tricks, making it easy to create engaging tutorials, presentations, and more. You can customize keyboard shortcuts, improve audio quality, and even edit your recordings for a polished finish. Sharing and collaborating are simplified through Google Drive, email, cloud-based services, and collaboration tools. With these resources at your fingertips, I encourage you to unleash your creativity and productivity by harnessing the power of screen recording on your Chromebook. Happy recording!